Monday, December 24, 2012

Let in Snow and Keep Smiling :)

A year has passed, a few more days we will enter the new year. Year filled with hope, excitement, and new dreams. So much has happened in this year, which brought a lot of happiness to me.

I am very grateful to have people around me who are very supportive of everything I do, especially my husband who is always encouraging and never tired to listen to me.


I learned many new things this year and I hope to be even better in the years to come.

Snowman Christmas Cookies

Thank you all our valued customers, for your support throughout the year. We are grateful for the pleasure of serving you and meeting your cakes and cookies needs.

Santa Cookies

Merry Christmas and Happy New Year everyone, may this festival bring abundant joy and happiness in your life!


Christmas Cookies

Keep the spirit, pray and don't forget to always smile :)

Christmas Cookies


luv, Sandra

Monday, December 3, 2012

Chocolate Cherry Cupcakes with Dark Chocolate Ganache


Hi everyone, I hope you all are doing well. It's been a while since my last update and I really miss to share my experiences and more recipes with you all.

Chocolate Cherry Cupcakes

I was busy in developing some new cake decorating technique lately. Continuous learning has always been important to me. I have participated in some cake decorating courses in Singapore to improve my essential skills.

I met a very talented, creative and passionate people there. Some of them travel from their country just to attend the courses. In that class, we need to stand for 7 hours a day.
Nothing in the world is worth having or worth doing unless it means effort, pain, difficulty...
But it's worth for me... and I am very pleased to meet with those experts :).

While I was there, I had the opportunity to try a lot of cupcakes in various pastry shops. I was obsessed with cupcakes lately. A wide range of flavors that I had never tried before, one of which I will share the recipe with you now.
So..., let's start with sweet and sour, where it comes from?

Bonne Maman Cherry Preserve

Made in France using all natural ingredients with no artificial colorings, no additives or preservatives.
Yes..!!! Bonne Maman Cherry Preserves.

The questions is "How often do you buy or taste cherry jam?"
To be honest, this is the first time I bought and tasted it.
I like the packaging so much and felt in love since the first time I saw it. It looks like a traditional kitchen storage jar and a homemade version in my opinion.
Bonne Maman Cherry Preserve
Let me show you what this looks like inside...Some of them told me that Morello Cherry Jam is the best to make Cherry Cupcake. 
The problem is, how can we get those brand in Asia? In my opinion, it won't be a problem if you're using different brands. Who knows the result will beeven better. So don't be confuse...

When you're bored with ordinary cupcake flavors, be creative. Create a unique name, take inspiration from other desserts, as even the smallest addition can add a new depth of flavor. Icing is extremely versatile and easy to add flavor too. So don't be afraid to experiment, you'll never know what you'll get.

Chocolate Cherry Cupcakes

Chocolate Cherry Cupcakes with Dark Chocolate Ganache
Active Time: 1 hour
Total Time: 2 1/2 hours
Yiels: 12 servings


INGREDIENTS
For the cupcakes
125 g unsalted butter (soft)
100 g dark chocolate (broken into pieces)
300 g Cherry Jam 
150 g caster sugar 
1 pinch of salt 
2 large egg (beaten)
150 g self-raising flour 

For the dark chocolate ganache
100 g dark chocolate
100 ml double cream  
Dark Rum (optional) 

INSTRUCTIONS
For the cupcakes
1. Preheat the oven to 180ºC (350ºF).
2. Put the butter in a heavy-bottomed pan on the heat to melt. When nearly completely melted, stir in the chocolate. 
Leave for a moment to begin softening, then take the pan off the heat and stir with a wooden spoon until the butter and chocolate are smooth and melted.
3. Add the cherry jam, sugar, salt and eggs. Stir with a wooden spoon and when all is pretty well amalgamated stir in the flour.
4. Scrape and pour into the muffin papers in their tin and bake for 25 minutes. Cool in the pan on a rack for 10 minutes before turning out.

For the ganache
1. When the cupcakes are cool, break the chocolate for the icing into little pieces and add them to the cream in a saucepan. 
Bring to the boil, remove from the heat and then whisk - by hand or electrically - till thick and smooth.
2. Ice the cupcakes, smoothing the tops with the back of a spoon, and stand a cherry in the centre of each if you want.

NOTES
•  Salted or unsalted butter? both works well for me.
•  To make self-raising flour; for each cup of plain flour (or all-purpose flour) add 1½ teaspoons of baking powder and ½ teaspoon of salt, sifted.
• Place any remaining ganache in airtight containers and refrigerate up to a week, or freeze for up to 2 months, bringing back to room temperature before rewhipping to smooth consistency.

luv, Sandra


Friday, October 12, 2012

Black Beauty with Vinism Sugar Art

Kelvin Chua Vinism Sugar Art

As much as I love making vintage cakes, this is the one I am most excited about having had the opportunity to make.
I am extremely grateful that I got this opportunity as it has been invaluable for my learning. 
This is the first cake decorating class I have ever attended and Kelvin Chua from "Vinism Sugar Art" was a fantastic teacher. 
Needless to say I am now completely hooked on making lace and hope to learn even more in the future.

Vinism Sugar Art

Vinism Sugart Art is an award winning wedding cake in Salon Culinaire Hotelympia 2010, United Kingdom. A cake designer, sugar artist and sugar craft instructor based in Malaysia. Kelvin run workshops overseas ie: Singapore, Hong Kong, Jakarta, Melbourne, The Netherlands, Barcelona and London. He is so down to earth and funny person.

Vinism Sugar Art

The details of the cake were breathtaking.
He works hard to make sure everything is taken care of and is quick and decisive in dealing with any problems.

Vinism Sugar Art

All decorations were piped with Royal Icing, including the filigree hat.


Vinism Sugar Art

The flowers finished by the Brush Embroidery Technique.
This technique resembles fine stitch work seen on the most beautiful table cloths, napkins and fine linen. Brush Embroidery is an English style technique that provides us with an approachable, yet stunning technique of transposing a simple cake to a stunning work of art.

We will learn how to first transfer a design to a cake, then outline the design and learn how to create beautiful brush strokes that gives a cake a transparent, yet breathtaking look. Some additional free-hand embroidery techniques will also be included with the brush work.

Vinism Sugar Art

It's been a wonderful class. I have met people from all over the world (Pomme-Thailand, Susan-Singapore, and Andrea-US) and I have learned lots of things. "It is a small and warm class", everyone has been very helpful to each other.

Vinism Sugar Art

Thank you guys! and specially my great teacher. It's been a great journey to know all of you, I've had the best time.  

Kelvin Chua Vinism Sugar Art

luv, Sandra

Wednesday, September 5, 2012

Perfect Double Dark Chocolate Cake

Who does not love chocolate cake?
I guess no one.


Dark Chocolate Cake

Imagine what is called "The perfect chocolate cake" ... Moist dark chocolate butter cake, infused with rum, layered and covered with soft dark chocolate frosting, hum...SUPER Yummy... Oh... I love LOVE Chocolate Cake :#

Nope..., not the vegan version, which is most of them substitute butter with oil. Even they said it's a lot more healthier, but I do love butter and will almost always choose butter over oil in baking.
Well.. I am a butter lover.

I often find that I opt for the deepest, darkest chocolate cake paired with the sweet frosting–I love the contrast. In this case, the contrast of sweet and bitter of the chocolate is what I’m passionate

Dark Chocolate Cake

With the flavors of chocolate and rum, this cake tastes like it’s loaded with all the good things in the world. The rum acts as the perfect preservative. It freezes beautifully also.
This recipe calls for Bacardi Rum, but you can use your favorite brand.

Barcadi is a popular brand of rum which is commonly used to make mixed drinks at bars and parties, it works well on my cake.
I personally think that it'll never get dry enough as it stays moist a long time. The longer this cakes sits, the better the taste.

The recipe is for a 8-inch round 4-layer cake. This cake is composed of four moist chocolate layers that are frosted with Rich Chocolate Frosting over the top of that. It is a gorgeous cake and is absolutely delicious!


Dark Chocolate Cake
  
Perfect Double Dark Chocolate Cake   
Yield: 10 to 12 servings
Active Time: 1 hour
Total Time: 3 1/2 hours


INGREDIENTS
For the cake
55 g best quality of natural cocoa powder (not Dutch-process)
1 cup (236 g) boiling water
2 tablespoons butter, softened to room temperature

2 cups (400 g) sugar
2 cups (228 g) self-rising flour
½ cup (113 g) additional butter, softened to room temperature
½ cup (120 g) buttermilk
2 eggs
1 teaspoon vanilla extract

For the rich chocolate frosting
(2) 1-oz. (60 g) squares unsweetened chocolate
½ cup (113 g) butter, softened to room temperature
1 egg
1 tablespoon half-and-half
2 teaspoons vanilla extract
1 ½ teaspoons lemon juice
16-oz. (450 g) package confectioner's sugar
Dark Rum (optional) - I use Bacardi Dark Rum

INSTRUCTIONS
For the cake
1. Preheat oven to 350°F and put oven rack in the middle. Grease two 8-inch round cake pans, dust with flour or cocoa powder, tap out excess and set aside.
2. In a small saucepan, combine cocoa powder, boiling water, and 2 tablespoons butter. Stir until smooth and set aside.
3. Place sugar and self-rising flour in a large mixing bowl and stir until well-blended. 
4. Add cocoa mixture and ½ cup butter. Use an electric mixer on medium speed to blend.
5.  Add buttermilk, eggs, and vanilla. Beat for 2 minutes with electric mixer.
6. Spread batter evenly in pans (you can weigh batter in pans for perfectly even layers) using a small offset spatula, rap pans several times on counter to eliminate any air bubble.
Bake on center rack until a toothpick comes clean and remove cakes from oven, about 25-30 minutes.
7. Cool cake in pans for about 10 minutes, and then carefully loosen them from the edges of the cake pans with your small palette knife, cool completely on racks.

For the frosting
1. Place unsweetened chocolate in top of a double boiler. Bring water in double boiler to a boil over medium heat. Reduce heat to low and heat chocolate until it melts. Set aside to cool slightly.
*Or you can place the chocolate in a microwave safe bowl for 30 seconds. Stir. Repeat these steps until the Chocolate is almost completely melted.
2. Place butter in a large mixing bowl. Mix with an electric mixer.
 Add cooled, melted chocolate, egg, half-and-half, vanilla, and lemon juice. Mix well with mixer.
3. Continue to mix with mixer while slowly adding the confectioner's sugar. Beat until the mixture is smooth and spreadable. 

ASSEMBLY
1. Trim any doming from the tops of your cake layers with a sharp, serrated knife and slice each cake in half so you have 4 layers of the same depth (about 2 cm each). Place first layer, face up, on your cake board, pedestal, or plate
2. Soak the tops of the cake with rum.
3. Using a small offset palette knife, spread approximately 1/2 cup of the chocolate frosting evenly on the top.
4. Repeat this 1-3 until you come to the final layer.
5. Place cake on a turntable (if possible), and using a small offset palette knife for the top of the cake, and medium straight palette knife for the sides, cover the cake in a thin layer of chocolate frosting (or chocolate buttercream, if using) to mask (seal in crumbs). Refrigerate for 30 minutes (or more).
*This does not need to be perfect, as that will come with the top “coat” of buttercream.
6. Repeat step 5, and, for best results, use bench scraper held at 90° against the side of the cake, slowly turning the turntable and keeping your hand steady–let the turntable do the work. Clean up edges with your small offset palette knife.
7. Chill cake to set. *Bring to room temperature before serving–about 2+ hours.
8. Sprinkle with silver dragees. 
9. Serve at room temperature, and slice with a long, thin-bladed, sharp knife. Rinse knife with hot water and dry before each new slice, for best results.

NOTES
 Salted or unsalted butter? both works well for me.
 To make self-raising flour; for each cup of plain flour (or all-purpose flour) add 1½ teaspoons  of baking powder and ½ teaspoon of salt, sifted.
 You can use yogurt, whipped cream or fresh milk instead of half-and-half.
 Place any remaining buttercream/frosting in airtight containers and refrigerate up to a week, or freeze for up to 2 months, bringing back to room temperature before rewhipping to smooth consistency.


enjoy :*
luv, Sandra


Saturday, August 18, 2012

Pink Love Chocolate Sandwich Cookies

Icing sugar cookies, fondant decorated cookies, cookies with jam filling....was pretty sweet kind of cookies. I've recently found that I no longer particularly like too sweet thing, though I crave cookies with tea or coffee.

Chocolate chip cookies are one of my favorites. For starters even though I loved them, I realized how sweet they were if I weren’t dunking them in milk — which of course everyone knows that I have to dunk them, but sometimes I just want the cookie without the milk.

Chocolate Sandwich Cookies
  
So.. how about another cookie version?

It is satisfyingly sweet, but not too sweet. This variation, suits our tastes very well. It makes a wonderfully crisp edges cookie that is great with milk, coffee or by itself.
This time it was my version of the cookie and I thought now would be a good time to share it with you.
  
Sandwich Cookies

This recipe is the perfect consistency for rolling and cutting.
A great tip; while you are making, it's better to place two 1/4″ wooden dowels on either side of your dough (they will ensure that your dough is even thickness), then another sheet of plastic wrap.

Sandwich Cookies

Remember check up on them, do not over bake, once you see the edges turning golden brown, they’re ready! They might not look completely done, but they keep cooking after you take them out of the oven, so take them out anyway.

Sandwich Cookies

Do not waste the remaining chocolate, you can use it later to make another chocolate decoration.

Chocolate Sandwich Cookies

After they completely cool and the chocolate hard enough, we can wrap individually in plastic bag, tied with ribbon to make it look nicer, put inside beautiful box, and I'm sure, this will be a great gift for someone special =).

Sandwich Cookies


Pink Love Chocolate Sandwich Cookies
    
Yield: 36
Tip: Dough can be made 2 days ahead. Store the dough in a plastic wrap in the refrigerator.

INGREDIENTS
For the cookies
3 cups (390 g) plain (all-purpose) flour
1/2 teaspoon salt
1 teaspoon baking soda
1 cup (227 g) unsalted butter, room temperature
1 cup (200 g) granulated white sugar
2 large eggs
2 teaspoon pure vanilla extract

For the chocolate filling
100 g white chocolate compound
Red food Colouring (or any colour you like)

INSTRUCTIONS
For the cookies
1. In a separate bowl whisk together the flour, salt, and baking soda. Set aside.
2. In the bowl of your electric mixer, beat the butter and sugar until light and fluffy (about 3 minutes - do not over mix). Add the eggs and vanilla extract and beat until combined.
3. Add the flour mixture and beat until you have a smooth dough.
4. Divide the dough in half and wrap each half in plastic wrap. Press down with the palm of your hand and make a disc about 2″ thick.
5. Refrigerate for about one hour or until firm enouh to roll.
6. Remove one disc and remove plastic wrap. Place on top of a large piece of plastic wrap (I use a silicone rolling mat underneath to ensure it doesn’t slip while rolling, but you can even dampen counter so the parchment sticks a bit.), then place two 1/4″ wooden dowels on either side of your dough ( the purpose of using dowel is to make an even thickness of your dough), then another sheet of plastic wrap.
If you don't have a silicone rolling mat or wooden dowels, on a lightly floured surface, just roll out the dough to a thickness of 1/4 inch (1 cm). Keep turning the dough as you roll, making sure the dough does not stick to the counter.
7. Preheat your oven to 180C/ 350 F. Slide your parchment paper and dough onto a board, then place in refrigerator for about 15 minutes.
8. Remove from fridge and cut out desired shapes using a lightly floured cookie cutter, placing them on a baker’s half sheet lined with a Silpat Mat, with 2″ clearance around each one and the edge of sheet.
9. Place sheet with cookies into freezer for 15 minutes before baking. Then bake 10-12 minutes (depending on size), or until edges are golden brown.
10. Cool sheets on wire racks for 10 minutes, then gently remove cookies and place on wire racks to finish cooling.

For the filling
Melt the chocolate in a microwave, give colour as desire. Pour a teaspoon of melting chocolate on the cookie, then cover it with the other cookie.

NOTES
 For the dough you can use salted instead of unsalted butter (omitted the salt if you use salted butter).
 You can use any chocolate flavour or colour you like.
 Personally, I like the concentrated gel paste dyes that are sold in small containers. Only a very small amount is needed to color the chocolate.
• Cookies may be stored at room temperature in an airtight container for up to 2 weeks. They also freeze well.

enjoy :*
luv, Sandra

Tuesday, August 14, 2012

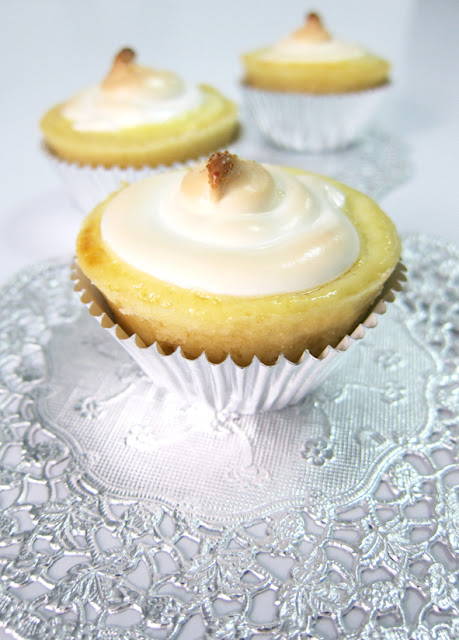
Limoncello Meringue Pies "The Afternoon Tea"

There are not many things in life that are more enjoyable than a nice cup of tea.
It's almost 5pm where I'm sitting so it's time to prepare my afternoon tea, styled like an English :)

Limoncello Meringue Pies

Maybe a little story about the Afternoon Tea...


Afternoon Tea is a tea-related ritual, introduced in Britain in the early 1840s. It evolved as a mini meal to stem the hunger and anticipation of an evening meal at 8pm.

Afternoon Tea is a meal composed of sandwiches (usually cut delicately into 'fingers'), scones with clotted cream and jam, sweet pastries and cakes. Interestingly, scones were not a common feature of early Afternoon Tea and were only introduced in the twentieth century.

It was initially developed as a private social event for ladies who climbed the echelons of society. It was only when Queen Victoria engaged in the Afternoon Tea ritual that it became a formal occasion on a larger scale, known as ‘tea receptions'.
In Britain today Afternoon Tea is usually enjoyed as an occasional indulgence or to celebrate a special event such as a birthday, or a pre-wedding or baby shower party with a group of friends (http://www.afternoontea.co.uk/index.php?option=com_content&task=view&id=840&Itemid=35).

So..., these are my lovely mini desserts....Limoncello Meringue Pies adapted from "The Women's Weekly Afternoon Tea Magazine" recipe.

Limoncello Meringue Pies

Aren't they so tempting?
A not too sweet pie crust with sour lemon curd filling, and the sweetness of meringue on top produces a perfect balance.

I could not resist when I saw this magazine and  I’ve been reading this incredibly inspiring book every day since bought it.
I bought this last year when I was at the Page One bookstore, Singapore. It was published by ACP Magazines "The Australian Women's Weekly Test Kitchen".


Women's Weekly Afternoon Tea

This book stated that with more than 70 million cookbooks sold, every single recipe is carefully Triple Tested and giving the reassuring guarantee that comes with all their cookbooks, wherever you are in the world success first time, every time.

It
contains 52 mini dessert recipes, including finger sandwiches, scones, pastries, cakes, biscuits and slices. There are also comes with some tips and techniques, glossary, and conversion chart.
For me, this book not only has a simple recipe, easy to follow step by step, but it also comes with a beautiful pictures.
So here we go with the recipes and instructions, just follow it with patient and I promise you that it’s worth it to try.


Limoncello Meringue Pies


Limoncello Meringue Pies     
Prep + Cook Time 1 hour 15 minutes (+ refrigeration & cooling)
Yield: 24

Tip: Curd can be made 2 days ahead. Store the curd in an airtight container in the refrigerator.

INGREDIENTS
For the pastry
1 3/4 cups (260 g) plain (all-purpose) flour
1/4 cup (40 g) icing (confectioners') sugar
185 g (6 ounces) cold unsalted butter, copped coarsely
1 egg yolk
2 teaspoon iced water, approximately
3 egg whites
3/4 cup (165 g) caster (superfine) sugar

For the limoncello curd
3 egg yolks
1/2 cup (110 g) caster (superfine) sugar
1 teaspoon finely grated lemon grind (peel)
1/4 cup (60 ml) lemon juice
90 g (3 ounces) cold unsalted butter, chopped
1 tablespoon limoncello liqueur

INSTRUCTIONS
For the limoncello curd
1.Whisk egg yolks and sugar in medium heatproof bowl until pale and thickened slightly. 
2. Whisk in rind and juice; stir over medium saucepan of simmering water about 12 minutes or until mixture coats the back of a spoon.
3. Remove from heat; gradually whisk in butter until combined between additions. Stir in limoncello; cover; refrigerate overnight.

For the pastry
1. Process flour, icing sugar and butter until crumbly. With motor operating, add egg yolk and enough of the water to make ingredients cling together.
Turn dough onto floured surface, knead gently until smooth. Wrap pastry in plastic; refrigerate 30 minutes.
2. Grease two 12-hole (1 tablespoon/ 20 ml) mini muffin pans. Roll out half the pastry between sheets of baking paper until 5 mm (1/4 inch) thick.
Cut out 12 x 6 cm (2 1/4 inch) rounds; press rounds into holes of one pan.
Prick base of cases well with a fork. Repeat with remaining pastry. Refrigerate 30 minutes.
3. Meanwhile, preheat oven to 220 C/ 425 F
4. Bake cases about 12 minutes. Stand cases 5 minutes before transferring to wire rack to cool.
5. To make Meringue; Beat egg whites in small bowl with electric mixer until soft peaks form. Gradually add caster sugar, beating until dissoved between additions.
6. Increase oven temperature to 240 C/ 475 F.
7. Divide limoncello curd into cases. Spoon meringue mixture into piping bag fitted with 1 cm (1/2 inch) plain tube; pipe meringue over curd. Bake about 2 minutes. Cool.

NOTE
• You can use salted instead of unsalted butter


Good luck and enjoy :*
luv, Sandra


Friday, July 13, 2012

Baking Conversion

I am offering a chart of weights for your convinience in converting other recipes (mostly adapted from "The Cake Bible" by Rose Levy Beranbaum).

There is no doubt about it; weighing is faster, easier, and more accurate than measuring.
The gram have been rounded off to the nearest whole number without decimal points (except for leavening which needs to be more precise).

For those who measure instead of weigh, the dip and sweep method of measuring refers to dipping the measuring cup into a bin containing the ingredient and sweeping off the excess with a long, flat spatula or knife. Be sure to whisk the flour lightly first as in settles on standing.

Lighty spooned into cup refers to spooning the ingredient into the cup and then sweeping of the excess with a long, flat spatula or blade. This method yields less of the ingredient than the dip and sweep method.

Sifted means that the ingredient is sifted into a cup that is sitting on counter. The cup is never touched or (perish the thought) shaken. Only the handle is held when the excess is swept off with a spatula or knife.

*Liquid igredients, including honey and other syrups, should be measured in a liquid measure with a spout. There is a difference in volume between liquid and solid measuring cups. The most accurate liquid measure at the present time is made by Oven Basics.


 Weight of 1 Cup in Gram 

Baking ConversionFATS                                 
Butter - 227
Clarified butter - 195
Cocoa butter - 256
Vegetable shortening - 191
Mineral oil - 196
Safflower oil - 215
Walnut oil - 215
Vegetable oil - 215

 
Baking ConversionFLOURS
Cake (sifted) - 100
Cake (lightly spooned) - 114
Cake (dip and sweep) - 130


All-purpose (sifted) - 114
All-purpose (lightly spooned) - 121
All-purpose (dip and sweep) - 145

Bread (sifted) - 121
Bread (lightly spooned) - 130
Bread (dip and sweep) - 157

Buckwheat (lightly spooned) - 115
Buckwheat (dip and sweep) - 125
 
Whole wheat (sifted) - 125
Chesnut (sifted) - 109
Cornstarch (lightly spooned or sifted) - 120
 
Dutch processed cocoa (sifted) - 75
Dutch processed cocoa (lightly spooned) - 92
Dutch processed cocoa (dip and sweep) - 95
 
Nonalkalized cocoa such as Hershey's (sifted) - 75
Nonalkalized cocoa such as Hershey's (lightly spooned) - 82
Nonalkalized cocoa such as Hershey's  (dip and sweep) - 95

 
Liquid Baking Conversion
LIQUIDS
Heavy cream - 232
Milk, buttermilk, sour cream, half and half, mayonnaise, coconut milk - 242
Molasses - 322
Corn Syrup - 328
Glucose - 336
Honey - 336
Maple syrup - 320
Refiner's syrup - 340
Apple jelly - 308
Water - 236
Lemon juice (strained) - 250
Orange juice (strained) - 242
Amaretto - 250
Barack Palinka (apricot eau-de-vie) - 222
Chambord (black raspberry liqueur) - 260
Cherry Kijafa (cherry wine) - 255
Cognac - 225
Cointreau - 244
Kahlua (coffee liquer) - 267
Kirch (cherry eau-de-vie) - 224
Light rum - 224
Mandarine Napoleon - 243
Myer's Rum (dark rum) - 220
Pistasha - 200
Vodka - 230
William's pear liqueur or eau-de-vie - 222
Sweetened condensed milk - 306
Caramel sauce - 310


Baking Conversion
NUTS AND OTHERS
Almonds (slivered) - 120
Almonds (slice or coarsely chooped) - 85
Almonds (finely ground) - 107
Almond (powder fine) - 89

Walnuts and pecans (halves) - 100
Walnuts and pecans (coarsely chopped) - 114

Hazelnuts (whole) - 142
Pistachios (whole) - 152
Pine nuts - 135
 
Almond paste - 284
Hazelnut praline paste - 308

Puree de Marrons (unsweetened) - 252
Homemade Puree de Marrons (unsweetened)  - 244
Carma Puree de Maroons (25 to 30 percent sugar) - 272
Poppy seeds - 144
Flaked coconut - 75
Cornmeal - 150
Dried cranberries or raspberries or blueberries - 130
Raisins - 150
Diced mango - 165
Shredded Carrots - 135
Dried apricots - 170
Chocolate chips - 175
Mashed banana - 260
Apricot preserves - 250
Peanut butter - 245
Orange Marmalade - 243
 
Baking Conversion
SUGAR
Granulated and superfine (dip and sweep) - 200
Powdered (lightly spooned) - 115
Light brown (packed) - 217
Dark brown (packed) - 239


Baking ConversionEGGS
1 large egg (in shell) - 56.7
1 large egg (without shell) = 3 tablespoon + 1/2 teaspoon - 50
1 large egg white = 2 tablespoon - 30
1 large egg yolk = 3 1/2 teaspoon - 18.6


Spoon in Gram
1 tablespoon unsalted butter - 14
1 tablespoon vegetable oil - 15

1 tablespoon flour - 7.5
1 tablespoon dutch processed cocoa powder - 10
1 teaspoon baking powder - 4.9
1 tablespoon baking powder - 15
1 teaspoon baking soda - 5
1 teaspoon cream of tartar - 3.1
1 teaspoon salt - dipending on the ambient humidity between 5.7 to 6.7

1 tablespoon light corn syrup - 15
1 tablespoon granulated sugar - 12.5

1 teaspoon vanilla or almond extract - 5
1 tablespoon vanilla extract - 15
1 teaspoon grated citrus zest - 2

1 tablespoon water - 15
1 teaspoon vinegar - 5
1 teaspoon instant espresso - 4.5

1 teaspoon soft gel paste colour - 5
1 tablespoon preserves - 15
1 teaspoon gelatine - 3.1


Liquid volume
1 cup = 240 ml (milliliter) = 8 fluid ounce
1/2 cup = 120 ml = 4 fluid ounce
1/3 cup = 80 ml
1/4 cup = 60 ml = 4 tablespoons = 2 fluid ounce

1/8 cup = 30 ml = 1 fluid ounce

1 tablespoon = 15 ml = 3 teaspoons = 1/2 fluid ounce
1 teaspoon = 5 ml

1 pint = 480 ml = 16 fluid ounce
1 US quart = 0.946 liter ~=1 liter


Ounce in Gram
1/4 ounce = 7 grams
1/2 ounce = 14 grams
1 ounce = 28.3 grams (29 grams)
1.5 ounces = 43 grams
2 ounces = 57 grams
3.5 ounces = 100 grams
5 ounces = 150 grams
7 ounces = 200 grams
8 ounces = 225 grams = 1/2 pound
10 ounces = 300 grams
12 ounces = 350 grams = 3/4 pound
14 ounces = 400 grams
16 ounces = 450 grams = 1 pound
18 ounces = 500 grams
24 ounces = 750 grams = 1.5 pounds
32 ounces = 900 grams = 2 pounds
64 ounces = 4 pounds = 1.8 kilograms


Equivalents


1 1/2 tsp = 1/2 tbsp. = 1/4 oz. = 7 grams
3 tsp =  1 tbsp. = 1/2 oz. = 14 grams
2 tbsp. = 1/8 cup = 1 oz. = 28 grams
4 tbsp. = 1/4 cup = 2 oz. = 55 grams
8 tbsp. = 1/2 cup = 4 oz. = 115 grams
16 tbsp. = 1 cup = 8 oz. = 225 grams


Oven temperatures

275°F = 140°C = gas mark 1
300°F = 150°C = gas mark 2
325°F = 165°C = gas mark 3
350°F = 180°C = gas mark 4
375°F = 190°C = gas mark 5
400°F = 200°C = gas mark 6
425°F = 220°C = gas mark 7
450°F = 230°C = gas mark 8
475°F = 240°C = gas mark 9


Synonym
All purpose flour = Plain flour
Arugula = Rocket
Baked potato = Jacket potato
Baking soda = Bicarbonate of soda
Beet(s) = Beetroot
Biscuit = Scone
Celery root = Celeriac
Cilantro = Coriander
Cookie = Biscuit
Corn starch = Corn flour
Cupcake = Fairy cake
Demerara sugar = Light brown sugar
Extract = Essence
Eggplant = Aubergine
Fava beans = Broad beans
French fries = Chips
French toast = Eggy bread
Frosting = Icing
Granulated sugar = Caster sugar
Green beans = Runner beans
Green onions/scallions = Spring onions
Heavy cream/heavy whipping cream = Double cream
Jello = Jelly
Jelly = Jam
Light cream = Single cream
Mimosa = Bucks Fizz
Molasses = Black/Dark treacle
Navy beans = Haricot beans
Oatmeal = Porridge
Potato chips = Crisps
Powdered sugar = Confectioner’s sugar = Icing sugar
Preserves = Conserves
Snow Peas = Mangetout
Soy = Soya
Tomato paste = Tomato puree
Whole wheat bread = Wholemeal
Zucchini = Courgette


Good luck and enjoy :*
luv, Sandra


Tuesday, May 22, 2012

"Mejikuhibiniu" The Art of Rainbow Cake

My niece is an artist. She realy loved to draw.
"This is Mimi, Papa, Koko Milo, Kung2, Nai2, Khu2, Suk2 and Me" she said, showing her pictures.

The most favorite is "A Rainbow" Me ji ku... hi bi ni u  "Did I spell it correctly, Auntie?"

Rainbow Cake

Mission Completed :#

Rainbow Cake


Rainbow Cake


I want to eat the rainbow...

Rainbow Cake

So this cake is made by the artist request :) , inspired by Martha Stewart Rainbow Cake recipe.

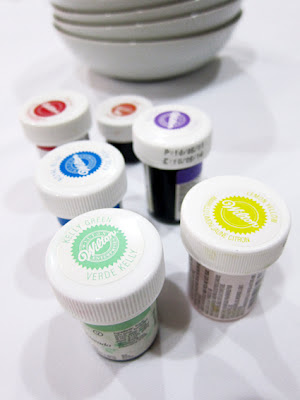
We need red, orange, yellow, green, blue, and purple gel food coloring for the cake. You can use oil based food colouring as well if you like. I prefer use Wilton food gel colour.

Rainbow Cake

In the bowl of an electric mixer fitted with the paddle attachment, cream together butter and sugar. Slowly add egg whites and mix until well combined. Add vanilla and mix until fully incorporated.
Add flour mixture and milk in two alternating additions, beginning with the flour and ending with the milk. Mix until well combined.

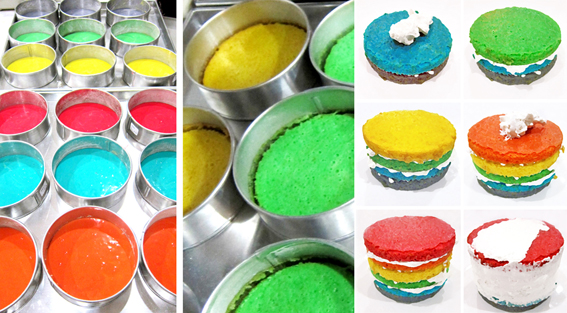
The Making of Rainbow Cake

Divide batter evenly between six medium bowls. Add enough of each color of food coloring to each bowl. Be careful, don't reverse the colour while layering :).

Rainbow Cake


Isn't she so adorable?

Rainbow Cake


Do u want it?

Rainbow Cake


Nyam..Mmmmm Slurp... quickly finish it...So........

Rainbow Cake


"I want more piece after this Auntie.."

Rainbow Cake

Both are my favorites: Rainbow cake and My Kung2 (behind me) "SMILE...eeE  Kung !!"

Rainbow Cake

"Thank you Auntie for the Lovely Cake"
"Welcomed my Dear, thank u for being my Model :*"

Rainbow Cake

Note from Mili the artist: Dear all...kindly contact my Auntie for order, thank u ....

2 Minutes Microwave Moist Chocolate Mug Cake

If there's anything on the earth that can bring a smile faster than a piece of cake, it's a cake you can make in five minutes. ...