Saturday, August 18, 2012

Pink Love Chocolate Sandwich Cookies

Icing sugar cookies, fondant decorated cookies, cookies with jam filling....was pretty sweet kind of cookies. I've recently found that I no longer particularly like too sweet thing, though I crave cookies with tea or coffee.

Chocolate chip cookies are one of my favorites. For starters even though I loved them, I realized how sweet they were if I weren’t dunking them in milk — which of course everyone knows that I have to dunk them, but sometimes I just want the cookie without the milk.

Chocolate Sandwich Cookies
  
So.. how about another cookie version?

It is satisfyingly sweet, but not too sweet. This variation, suits our tastes very well. It makes a wonderfully crisp edges cookie that is great with milk, coffee or by itself.
This time it was my version of the cookie and I thought now would be a good time to share it with you.
  
Sandwich Cookies

This recipe is the perfect consistency for rolling and cutting.
A great tip; while you are making, it's better to place two 1/4″ wooden dowels on either side of your dough (they will ensure that your dough is even thickness), then another sheet of plastic wrap.

Sandwich Cookies

Remember check up on them, do not over bake, once you see the edges turning golden brown, they’re ready! They might not look completely done, but they keep cooking after you take them out of the oven, so take them out anyway.

Sandwich Cookies

Do not waste the remaining chocolate, you can use it later to make another chocolate decoration.

Chocolate Sandwich Cookies

After they completely cool and the chocolate hard enough, we can wrap individually in plastic bag, tied with ribbon to make it look nicer, put inside beautiful box, and I'm sure, this will be a great gift for someone special =).

Sandwich Cookies


Pink Love Chocolate Sandwich Cookies
    
Yield: 36
Tip: Dough can be made 2 days ahead. Store the dough in a plastic wrap in the refrigerator.

INGREDIENTS
For the cookies
3 cups (390 g) plain (all-purpose) flour
1/2 teaspoon salt
1 teaspoon baking soda
1 cup (227 g) unsalted butter, room temperature
1 cup (200 g) granulated white sugar
2 large eggs
2 teaspoon pure vanilla extract

For the chocolate filling
100 g white chocolate compound
Red food Colouring (or any colour you like)

INSTRUCTIONS
For the cookies
1. In a separate bowl whisk together the flour, salt, and baking soda. Set aside.
2. In the bowl of your electric mixer, beat the butter and sugar until light and fluffy (about 3 minutes - do not over mix). Add the eggs and vanilla extract and beat until combined.
3. Add the flour mixture and beat until you have a smooth dough.
4. Divide the dough in half and wrap each half in plastic wrap. Press down with the palm of your hand and make a disc about 2″ thick.
5. Refrigerate for about one hour or until firm enouh to roll.
6. Remove one disc and remove plastic wrap. Place on top of a large piece of plastic wrap (I use a silicone rolling mat underneath to ensure it doesn’t slip while rolling, but you can even dampen counter so the parchment sticks a bit.), then place two 1/4″ wooden dowels on either side of your dough ( the purpose of using dowel is to make an even thickness of your dough), then another sheet of plastic wrap.
If you don't have a silicone rolling mat or wooden dowels, on a lightly floured surface, just roll out the dough to a thickness of 1/4 inch (1 cm). Keep turning the dough as you roll, making sure the dough does not stick to the counter.
7. Preheat your oven to 180C/ 350 F. Slide your parchment paper and dough onto a board, then place in refrigerator for about 15 minutes.
8. Remove from fridge and cut out desired shapes using a lightly floured cookie cutter, placing them on a baker’s half sheet lined with a Silpat Mat, with 2″ clearance around each one and the edge of sheet.
9. Place sheet with cookies into freezer for 15 minutes before baking. Then bake 10-12 minutes (depending on size), or until edges are golden brown.
10. Cool sheets on wire racks for 10 minutes, then gently remove cookies and place on wire racks to finish cooling.

For the filling
Melt the chocolate in a microwave, give colour as desire. Pour a teaspoon of melting chocolate on the cookie, then cover it with the other cookie.

NOTES
 For the dough you can use salted instead of unsalted butter (omitted the salt if you use salted butter).
 You can use any chocolate flavour or colour you like.
 Personally, I like the concentrated gel paste dyes that are sold in small containers. Only a very small amount is needed to color the chocolate.
• Cookies may be stored at room temperature in an airtight container for up to 2 weeks. They also freeze well.

enjoy :*
luv, Sandra

Tuesday, August 14, 2012

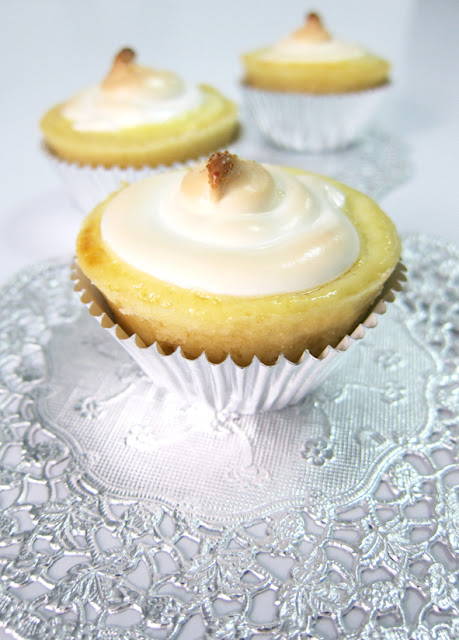
Limoncello Meringue Pies "The Afternoon Tea"

There are not many things in life that are more enjoyable than a nice cup of tea.
It's almost 5pm where I'm sitting so it's time to prepare my afternoon tea, styled like an English :)

Limoncello Meringue Pies

Maybe a little story about the Afternoon Tea...


Afternoon Tea is a tea-related ritual, introduced in Britain in the early 1840s. It evolved as a mini meal to stem the hunger and anticipation of an evening meal at 8pm.

Afternoon Tea is a meal composed of sandwiches (usually cut delicately into 'fingers'), scones with clotted cream and jam, sweet pastries and cakes. Interestingly, scones were not a common feature of early Afternoon Tea and were only introduced in the twentieth century.

It was initially developed as a private social event for ladies who climbed the echelons of society. It was only when Queen Victoria engaged in the Afternoon Tea ritual that it became a formal occasion on a larger scale, known as ‘tea receptions'.
In Britain today Afternoon Tea is usually enjoyed as an occasional indulgence or to celebrate a special event such as a birthday, or a pre-wedding or baby shower party with a group of friends (http://www.afternoontea.co.uk/index.php?option=com_content&task=view&id=840&Itemid=35).

So..., these are my lovely mini desserts....Limoncello Meringue Pies adapted from "The Women's Weekly Afternoon Tea Magazine" recipe.

Limoncello Meringue Pies

Aren't they so tempting?
A not too sweet pie crust with sour lemon curd filling, and the sweetness of meringue on top produces a perfect balance.

I could not resist when I saw this magazine and  I’ve been reading this incredibly inspiring book every day since bought it.
I bought this last year when I was at the Page One bookstore, Singapore. It was published by ACP Magazines "The Australian Women's Weekly Test Kitchen".


Women's Weekly Afternoon Tea

This book stated that with more than 70 million cookbooks sold, every single recipe is carefully Triple Tested and giving the reassuring guarantee that comes with all their cookbooks, wherever you are in the world success first time, every time.

It
contains 52 mini dessert recipes, including finger sandwiches, scones, pastries, cakes, biscuits and slices. There are also comes with some tips and techniques, glossary, and conversion chart.
For me, this book not only has a simple recipe, easy to follow step by step, but it also comes with a beautiful pictures.
So here we go with the recipes and instructions, just follow it with patient and I promise you that it’s worth it to try.


Limoncello Meringue Pies


Limoncello Meringue Pies     
Prep + Cook Time 1 hour 15 minutes (+ refrigeration & cooling)
Yield: 24

Tip: Curd can be made 2 days ahead. Store the curd in an airtight container in the refrigerator.

INGREDIENTS
For the pastry
1 3/4 cups (260 g) plain (all-purpose) flour
1/4 cup (40 g) icing (confectioners') sugar
185 g (6 ounces) cold unsalted butter, copped coarsely
1 egg yolk
2 teaspoon iced water, approximately
3 egg whites
3/4 cup (165 g) caster (superfine) sugar

For the limoncello curd
3 egg yolks
1/2 cup (110 g) caster (superfine) sugar
1 teaspoon finely grated lemon grind (peel)
1/4 cup (60 ml) lemon juice
90 g (3 ounces) cold unsalted butter, chopped
1 tablespoon limoncello liqueur

INSTRUCTIONS
For the limoncello curd
1.Whisk egg yolks and sugar in medium heatproof bowl until pale and thickened slightly. 
2. Whisk in rind and juice; stir over medium saucepan of simmering water about 12 minutes or until mixture coats the back of a spoon.
3. Remove from heat; gradually whisk in butter until combined between additions. Stir in limoncello; cover; refrigerate overnight.

For the pastry
1. Process flour, icing sugar and butter until crumbly. With motor operating, add egg yolk and enough of the water to make ingredients cling together.
Turn dough onto floured surface, knead gently until smooth. Wrap pastry in plastic; refrigerate 30 minutes.
2. Grease two 12-hole (1 tablespoon/ 20 ml) mini muffin pans. Roll out half the pastry between sheets of baking paper until 5 mm (1/4 inch) thick.
Cut out 12 x 6 cm (2 1/4 inch) rounds; press rounds into holes of one pan.
Prick base of cases well with a fork. Repeat with remaining pastry. Refrigerate 30 minutes.
3. Meanwhile, preheat oven to 220 C/ 425 F
4. Bake cases about 12 minutes. Stand cases 5 minutes before transferring to wire rack to cool.
5. To make Meringue; Beat egg whites in small bowl with electric mixer until soft peaks form. Gradually add caster sugar, beating until dissoved between additions.
6. Increase oven temperature to 240 C/ 475 F.
7. Divide limoncello curd into cases. Spoon meringue mixture into piping bag fitted with 1 cm (1/2 inch) plain tube; pipe meringue over curd. Bake about 2 minutes. Cool.

NOTE
• You can use salted instead of unsalted butter


Good luck and enjoy :*
luv, Sandra


2 Minutes Microwave Moist Chocolate Mug Cake

If there's anything on the earth that can bring a smile faster than a piece of cake, it's a cake you can make in five minutes. ...